This resource is part of our Communications Toolkit for Civic & Nonprofit Tech.
When you hear the word “brand,” you might think of commercial products, not civic and nonprofit tech.
You might be surprised to hear us say that your organization needs a brand, too – otherwise you’ll end up with a patchwork “brand” made up of mismatched elements you didn’t plan, and it might not send the right message.
A brand is a structured, consistent way to use words and media. When it’s working well, it uses these elements to express the values, purpose, and mission of a product or organization. Using an appropriate brand dramatically increases the trust that others will put in you – whether that be your community, your funders, or potential collaborators. (Here’s a case study on our work with the Linux distribution Tails to develop their brand.)
If you are not starting your brand from scratch, you may not need all the steps outlined below. You may have done some of the work already. However, if you haven’t yet done work to define your organization or tool’s mission and vision, please do not skip it! You may end up with a brand that looks pretty, but doesn’t actually communicate your values and purpose effectively. You can find more about branding in our guide to creating brand guidelines.
We strongly recommend involving your community in the branding process. They know things about your image, your reputation, and your communication style that you can’t possibly see from the inside. There are lightweight ways to involve community, and also more intensive models - what’s right for you depends on the scope of the project and also the availability and interest of community members.
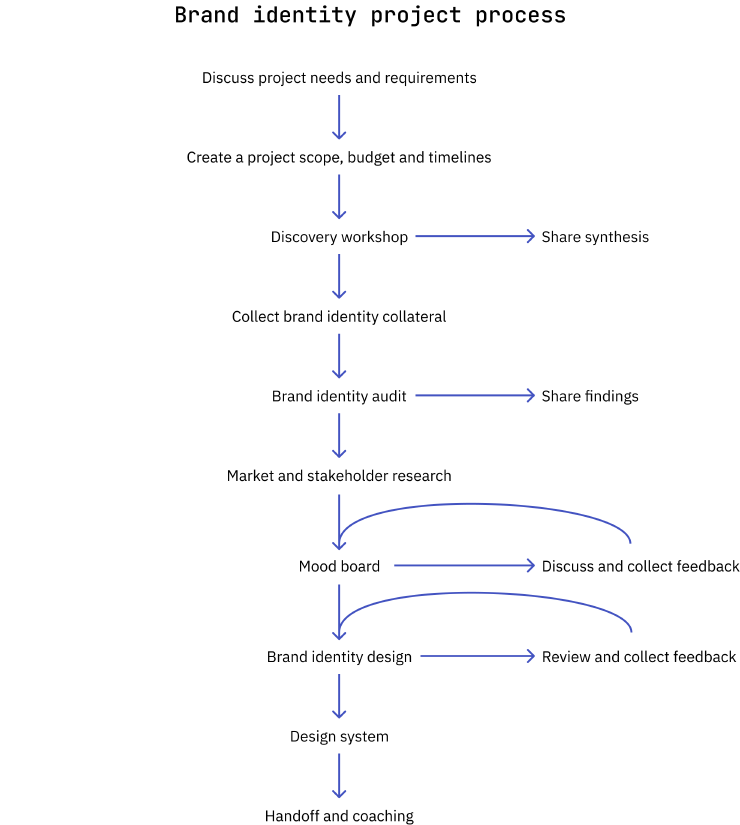
Where to start?
What do you need? How much money do you have? How much budget do you have? These three questions will guide the nuts and bolts of your brand design process.
In general, design professionals use the following steps to develop a brand.
- Scoping
- Positioning
- Brand audit
- Market research
- Stakeholder research
- Moodboard
- Brand design
- Review and feedback
- Brand design system
Scoping
Before you get started, you’ll need to understand the size and scope of the project you’re taking on. This questionnaire will help you understand high level requirements of the project so you can set up the right activities, processes, and timelines.
Positioning
Positioning refers to how people think about you in relation to other, similar organizations. Compared to others in your space, are you the big one, the small and nimble one, the quiet and serious one, the raucous one? To understand and create your position, you need to understand both who you already are, and who you’d like to become.
A positioning workshop should include people who understand the organization really well, such as the founding team and the current leadership.
Budgets and timelines may also affect the workshop. Hence, add or remove workshop activities as per your needs and the answers you are seeking. For example, if you know your audience well and have already documented it, then feel free to remove that from the workshop. Pick activities from the templates to reflect what you hope to learn about the project during the needs assessment workshop.
If you’re creating a new activity for your workshop which may benefit others, please share it with us! Write us at [email protected].
Brand audit
Collect all your brand collateral in one place: logos, letterheads, website screenshots, whatever you have. Look at it all together, and identify opportunities for improvement.
Use insights from the brand positioning workshop as a part of this exercise to set criteria for analysis. For example, if you figured out that your organization wants a playful visual style, then analyze the brand for playfulness.
Market research
Understand the landscape that your brand exists in by studying the organizations that work in the same domain and the organizations that the target audience is influenced by. Do a brief landscape map during needs assessment workshop, then follow it up with a more in-depth examination if you feel that would help.
- Behavioral persona for describing your audience, by Miro (Miro link)
- User persona for describing audience members, by Figma (Figjam link)
- Competitive analysis, by Miro (Miro link)
- What is competitive analysis? Article by Mailchimp
Stakeholder research
Learn what others think of your organization – we can tell you that you will be surprised, and it’s often a nice surprise, since we are our own worst critics!
Important stakeholders include the people you hope to impact, people who support you, funders, and employees/team members. Get feedback from them on any previous existing brand assets, and ask questions to understand how they perceive the brand and organization.
Suggested activities include interviews, either short or longer, and questionnaires. You may also find these Miro boards useful to make sense of the information you gather:
Moodboard
An essential step for most branding projects, a moodboard will help to explore a visual direction for the brand. You will collect images that you like in order to create an inspiration guide for your visual style. Gather examples from food, fashion, art, and your daily life – not just from other tech tools and organizations!
Creating a moodboard can be a great exercise to do together with your community. Just make sure you also take time to focus, or make decisions, after you’ve done your creative brainstorming together.
Brand design
After all this research and planning, it is finally time for creative development! This is where you put pencil to paper: define the brand direction, sketch logo ideas, build a brand narrative, apply the moodboard to sketches, and create a brand design.
If you have been working with an external designer, they will provide a lot of support and ideas here. It’s reasonable to ask for several directions, so that you can discuss them together and decide what works best.
Review and feedback
Arrange review sessions where the people working on the project can present the brand design and synthesis and get reactions. Always present the background work and the rationale, not just the visuals! You want people to react based on whether the brand communicates the desired message, not just on whether they “like it” or not.
You don’t need to wait until everything is done. Feedback is useful even if the work is only 80% or so complete.
We are huge fans of involving your community in this process. However, we really do not recommend getting opinions on a brand in progress on social media or via a public poll, even if you usually work in the open. People will react to your work in isolation without knowing the “why” behind it, and the result won’t tell you anything about which logo or color scheme is actually better for what you need. Much better to convene a session of community members, lead them through the background and goal of your project, and then ask them if your design ideas are actually doing the job.
Brand design system
This is the final output and deliverable. It describes the story and rationale behind the logo, colors, typeface, illustrations, and visuals, linking them to the organization’s brand values. It also gives instructions on how and why to use all components.
- Style guide template (Figma file)
- For example style guides, see the guide to creating brand guidelines.
Brands need to be designed, and then they need to be put into practice. Now that you’ve designed your brand, you can get started on implementing it.
One of the quickest ways to see results is by creating some templates. Here are some templates for commonly used communications collateral.
| Resource | To help you with |
|---|---|
| Guide: Social media graphics | Creating, researching, planning and publishing content on social media. |
| Template: Social media text (Google Docs) | Planning your text for social media. |
| Template: Social media visuals (Miro) | Preparing images in the recommended sizes before you post. |
| Questionnaire: Tone & voice (Google Docs) | Establishing a consistent and impactful tone and voice in your communications efforts. |
| Template: Lightning talk (Google Slides) | |
| Template: Organizational overview (Google Slides) | |
| Template: Research shareout (Google Slides) | |
| Template: Report (Google Docs) | Creating a report with ready-to-use formatting. Insert your own fonts and colors. |
| Template: Press release (Google Docs) | Creating a press release with ready-to-use formatting. Insert your own fonts and colors. |
This toolkit was developed with the support of the Open Technology Fund Learning Lab. Got feedback? Want to work together? Please write to us at [email protected].