How do you find out if the software you are building is usable and useful for others? We’ve written this blog post about how to address this challenge! It is often easiest to try out the software when it’s been fully built, but this is also when any mistakes are most difficult to fix because so much has already been coded. This is a concern and a challenge for product managers, developers and UX designers alike.
Users don’t care about your database access layer or your programming language. But they do care about how the software looks and behaves. In this post I demonstrate four methods to get feedback from users without having to first write all the code. These are:
- Sketching
- Paper prototyping
- Creating a part of the frontend only
- “Developing outside-in”, that is, quickly creating a running version of the software
The above list is in order of complexity and closeness to the finished product: Both sketching and paper prototyping do not require any code, and creating part of the frontend only requires some coding. “Developing outside-in” does not only need code, it actually builds upon code that you can (potentially) use to build the actual product.
With this said, let’s look at the first of the methods, Sketching and talking.
Sketches and talking
Problem
Talking about your idea and concept is simple. You do not need any tools and can do it wherever you may be. However, when talking about how easy the software will be to use, it is very easy to talk about imagined results and intended impressions rather than how something appears to the user. You might say that users can “simply select an item” but this is literally easier said than done. It is also very easy to state things that turn out to be impossible: e.g. “the dialogue provides the information”, but the dialogue only fits one of the five sentences needed. Or “select one of the five buttons” when there would be only space for two. You need something more concrete, with easily usable constraints.
Solution
The simplest way to obtain useful feedback is to combine your explanations with simple sketches.
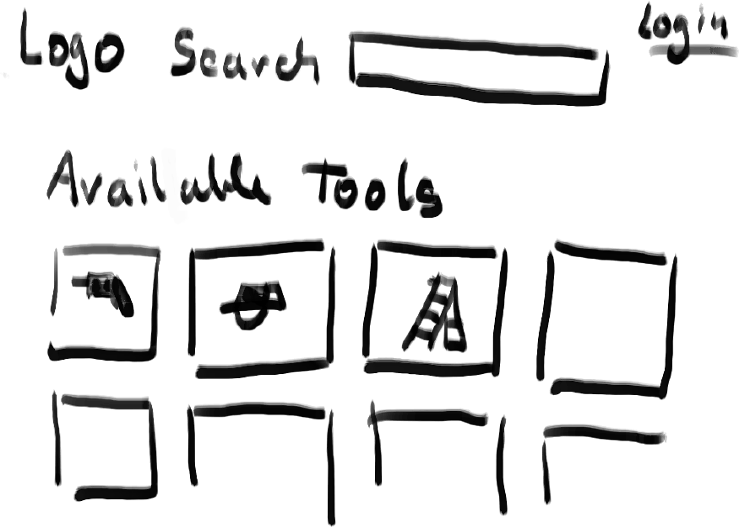
Draw rough sketches of how the interface would look and work. For me, a black marker and A5 paper works well. Sketches do not need to stand on their own, but should work with your explanations. The result will be similar to a storyboard that runs in parallel with your words.
When creating sketches, you will probably notice problems as well as opportunities that were not as obvious when they were simply an idea.
It is best to focus on a single feature or idea first; there is no need to sketch and explain everything. It’s better to start in a focussed way and iterate on it rather than do it all at once.
When you have finished the sketches that illustrate the step-by-step use of a feature, it’s a good idea to show them to team members or potential users and walk them through the processes to show how the interaction with the software would work. Ask for feedback to find out if the feature makes sense and to find out if the interactions are intuitive and familiar.
Note: If you first want to develop ideas within your team, try the Design Studio method, a way to collaboratively create and give feedback on designs.
Note: It is tempting to try out totally new ways to build interfaces, but often the most obvious solutions are the most intuitive for the users. This is because new interfaces are understood by using past experiences. Read more in Jef Raskin’s “Intuitive Equals Familiar”.
Simple prototypes, no code involved
Problem
You have ideas about how users can interact with your product. But, before you start coding, you want to test your designs and find out the strengths and problems of different approaches.
Solution
Build an interactive prototype from sketches, simulate interactions by acting as the computer and swap out parts of the interface.
Using sketches, you can try out interfaces and you can communicate them in a more concrete way. With some additional effort, you can use sketches to test the interface with users by building a paper prototype. A paper prototype shows your interface on paper, but it is interactive in a limited way. You simulate the computer and swap out parts of the interface.
Providing explanations about how things work defeats the purpose of seeing how people would interact with an interface when on their own. This means that you can still opt for a simple look, but elements should be clearly recognizable i.e. labels should be readable, buttons should look like buttons etc.
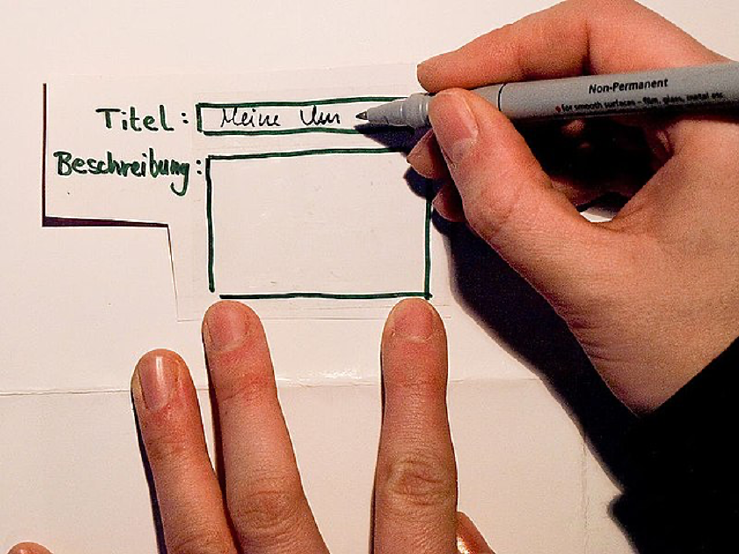
The user testing the interface interacts with it by pointing to elements and saying something like “I click here” and may also fill out forms. You can get creative: Build parts that you can unfold, simulate forms using tape you can write on with a non-permanent marker, have separate pop-ups or transparent overlays. Have some blank paper ready as sometimes you’ll need to improvise and add elements.
Still too abstract? Watch this example for how this works!
Paper prototypes are fun to create and clearly communicate that software is not yet finished; this directs feedback towards conceptual questions (do people understand how to check for the availability of an item?) and not questions of visual design (do users like this shade of green?). In our scenario, you could take the prototype to a meeting or event at the neighborhood center and ask people if they want to try it out.
There are several other ways to create testable prototypes. UI design tools such as Figma or Penpot, allow you to link different views so that users can navigate between them. This is great for link-based navigation, but if there are forms to complete, it is more difficult to prototype well. The biggest caveat is that these tools are usually made to specify UIs (color, fonts, positions…), rather than to quickly try them out. Therefore, it is easy to be distracted by exact colors, the width of borders, font selection and other options.
Similar link-based interactions can be prototyped with Powerpoint or LibreOffice Impress. If you have skills using spreadsheets and your application relies a lot on form-filling or visualizations, you can also prototype with Excel or LibreOffice Calc!
Read more about paper prototyping: https://alistapart.com/article/paperprototyping/
Write a part of the frontend only
Problem
Not all interactions can be easily prototyped on paper (e.g. filtering a list) and while sketches provide useful constraints about what you can and can’t do, they are still somewhat removed from how the actual UI will behave. But, how can you run your interface when you have barely written any code?
Solution
Write just parts of the interface you want to test in code and mock the rest.
To create your first prototype of the frontend, use tools that you are familiar with, so you can get a running version of the prototype quickly, without getting bogged down by discussions about the right technology.
In the end, your product will likely communicate with a server or read from a local file system. Usually, this is something you should ignore at this time: you only want to test a part of the interface. This means you mock the rest. Usually, this means you hardcode stuff into a variable that stands in for the server.
It is helpful not to concern yourself with code-reuse; be OK with throwing away the code. It is a prototype, after all, and if you worry about throwing it away you have probably over-engineered it beyond its original exploratory purpose.
To make sure the feedback you receive is useful, it’s important to make your prototype easy to try out and easy to distribute. Creating your prototype in a website that may be opened on a laptop or phone with a link to click on makes it easy to try out. Requiring knowledge of linux, git and docker will severely limit the range of people who can trial the prototype.
Developing your code outside-in
Problem
Now you are ready to start writing code for the real thing, i.e. not a prototype. Usually the code consists of several parts that need to work together (frontend/backend, Model/View/Controller etc.) Now, there is a danger of not planning enough and ending up with parts that don’t work together, or planning too much and getting stuck in analysis. In both cases, you may end up with a system that you can never try because a part does not work or refuses to play with others.
Solution
With your team members define the required parts of code. First, write the interfaces/contracts: The data they need and the data they provide. For now, enable the parts to simply exchange mock data. Afterwards, develop these components outward-in, always to keep the data exchange working. That way, you will always have a running system that you can demo!
The solution is to first focus on the communication between the parts and then build the system from the interfaces between the parts, outside-in. This might be counterintuitive, as it seems plausible for many to build inside-out, starting with an abstract core in each part of the system and then, at the very end, connect all of them together. But this means that you need to gamble on being able to connect the parts in the end, and that you always know what you are working towards, which is a great risk.
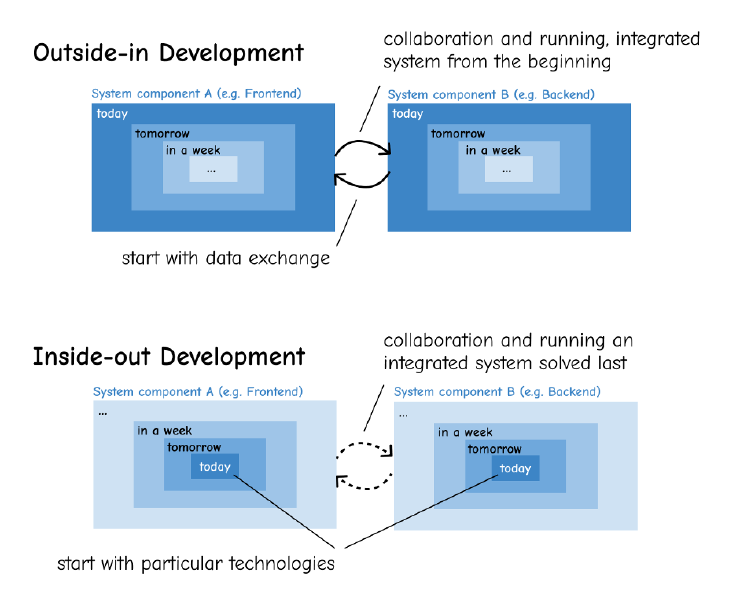
If you first decide upon the way that parts of the software will talk to each other, you will immediately get a running version of the software: The parts won’t yet do anything, but they will exchange mock data. That is enough to test if they work together. Then you can work on the components separately and reduce the mock data step by step. The backend- and frontend programmer might define what the HTTP-API should do to enable the core functionality: What should the frontend request, what should the server return? This is what forms the contract for how the parts communicate with one another. Now, the frontend programmer writes a function requesting data from the API and the backend-programmer writes a request handler that returns mock data. Then try it out. If it works, you can start to both build the interface and the backend. It is relatively easy to recognize the situations where you need the parts to talk to each other:
- When the contract needs to be extended e.g. when more data is needed from the server
- When the contract needs to be changed, e.g. the API is restructured
In all circumstances you should keep the system running, so if you e.g. extend the API, talk to your collaborators, define the data to be exchanged, mock it and then integrate the change with the self-contained part.
This method is also called tracer bullet development and is described in more detail in the books Ship It! and The Pragmatic Programmer.
Conclusion
When working on a project, you can use the methods in the order they appear in this blogpost: Early on you can start with sketching and talking, and then try crucial parts of the interface using paper prototyping. Then, when you have a good idea of what to build, see how it works on a screen by creating a part of the frontend only. When it comes to writing larger parts of the code, developing your code outside-in can ensure that you always have a running version that integrates all of the crucial parts, and allows you, your team and potential users to actually run your software while you write it.
I wrote this guide in the hope that it assists anyone writing user-facing software in general, and in particular for Prototype Fund coaching projects. If you’ve tried the methods outlined, I would be happy to hear about your experiences – drop me a mail at [email protected].
Credits
Thanks to Saptak S for reviewing.